
Blind Attempt: Nillion Wordle
By Anton Pyrogovskyi • 29 minutes read •
Table of Contents
- Summary / tl;dr
- Research
- Implementation
- Bootstrapping
- Hello, Nada World
- Building the UI
- Storing the letters
- Planning the game UI
- Exploring the default UI
- Computing a single row
- The game field
- Login-walling Wordle
- Uploading the Wordle program
- Passing inputs to the program
- Getting outputs from the program
- Lifting state up
- Decoupling the parties
- Correct and wrong letters
- Logging in via Keplr
- Full multi-party flow
- Going live
- Conclusion
Summary / tl;dr
Wordle is a simple but engaging daily word game known from The New York Times
Nillion is technology to compute on secrets without disclosing those
For the UI, create-nillion-app based on Next.js was used
This post covers the entire process in depth, step by step
It took ~1 month of time and ~700 lines of code
Nillion Wordle is live now — check it out! 🙂
Research
Discovering Nillion
Nillion is an innovative approach to decentralized computing over sensitive data. It uses a novel cryptographic technique called NMC, which allows for secure and private processing of High Value Data across a distributed network without the need for traditional blockchain consensus mechanisms. It has the potential to transform industries such as finance, healthcare, supply chain management and others by providing infrastructure for data-driven operations which are secure and privacy-preserving by default.
This is how Nillion can be explained briefly:
- there are some kinds of data which are highly confidential/valuable = HVD
- the best way to handle those is to avoid disclosing at all
- however, one might need to disclose the cleartext to a counterparty for legitimate uses
- what if one could provide limited & necessary insight into the data without exposing the data?
- what Nillion does is mask the data using several novel cryptographical methods
- for details on the cryptography used, see the tech papers
- this allows computation over secret data without the data being exposed
- this is
Humanity’s First Blind Computer
— computing without “seeing” the data!
- it is not a cryptocurrency but interacting with it may feel similar to one
- there is Nilchain , which tracks transactions
- there is NIL , the token which is used to pay for the services of the network
- there is Nada , the DSL for secret computation which may remind of smart contracts
The best way to understand technology is to use it, so now we need a project to build on Nillion…
Deciding on a project
For interested first-time builders, Nillion provides a list of Hackathon Project Ideas with limited scope to get started with. One of the options was Wordle . It had a well-defined spec which was nice. After considering some more ambitious but also much more complex beginning projects which would have inevitably taken me longer to develop, I have settled on a Wordle clone.
The first thing to do was, of course, to create a repo .
The second thing to do was dig into The Nillion docs and figure out how to use the tech.
Which leads us to…
Getting to know Nada
Nada is a DSL designed to facilitate secure MPC on the Nillion network. It:
- Provides “secret” versions of common data types and operations on them that ensure that the data remains confidential throughout the computation process;
- Allows writing programs that specify how secret data should be split, shared, and computed upon by multiple parties in a privacy-preserving manner;
- Abstracts away the complexities of the cryptographic operations required for this, which enables developers to focus on building applications which are secure and privacy-preserving by default.
Practically, this means that every single Nillion app will have a Nada program at its core, as Nada enables one to encode computations on secrets. The Nillion SDKs provide utilities for writing, testing, compiling and deploying Nada programs, storing the input values to be computed upon and getting the compute outputs back. The current concrete implementation of Nada is a subset of typed Python which uses a custom bytecode compiler.
So it looks like we’ll have to write a bit of Nada soon.
Let’s get started with building on Nillion!
Implementation
Bootstrapping
Luckily we do not have to start completely from scratch because there is the excellent create-nillion-app scaffold which bootstraps a minimal demo app. It is a great working example of interfacing with the core operations of the Nillion network. First commit 2dd355a with the scaffold — the job is half done. 🙂
This is what it looks like “out of the box”:
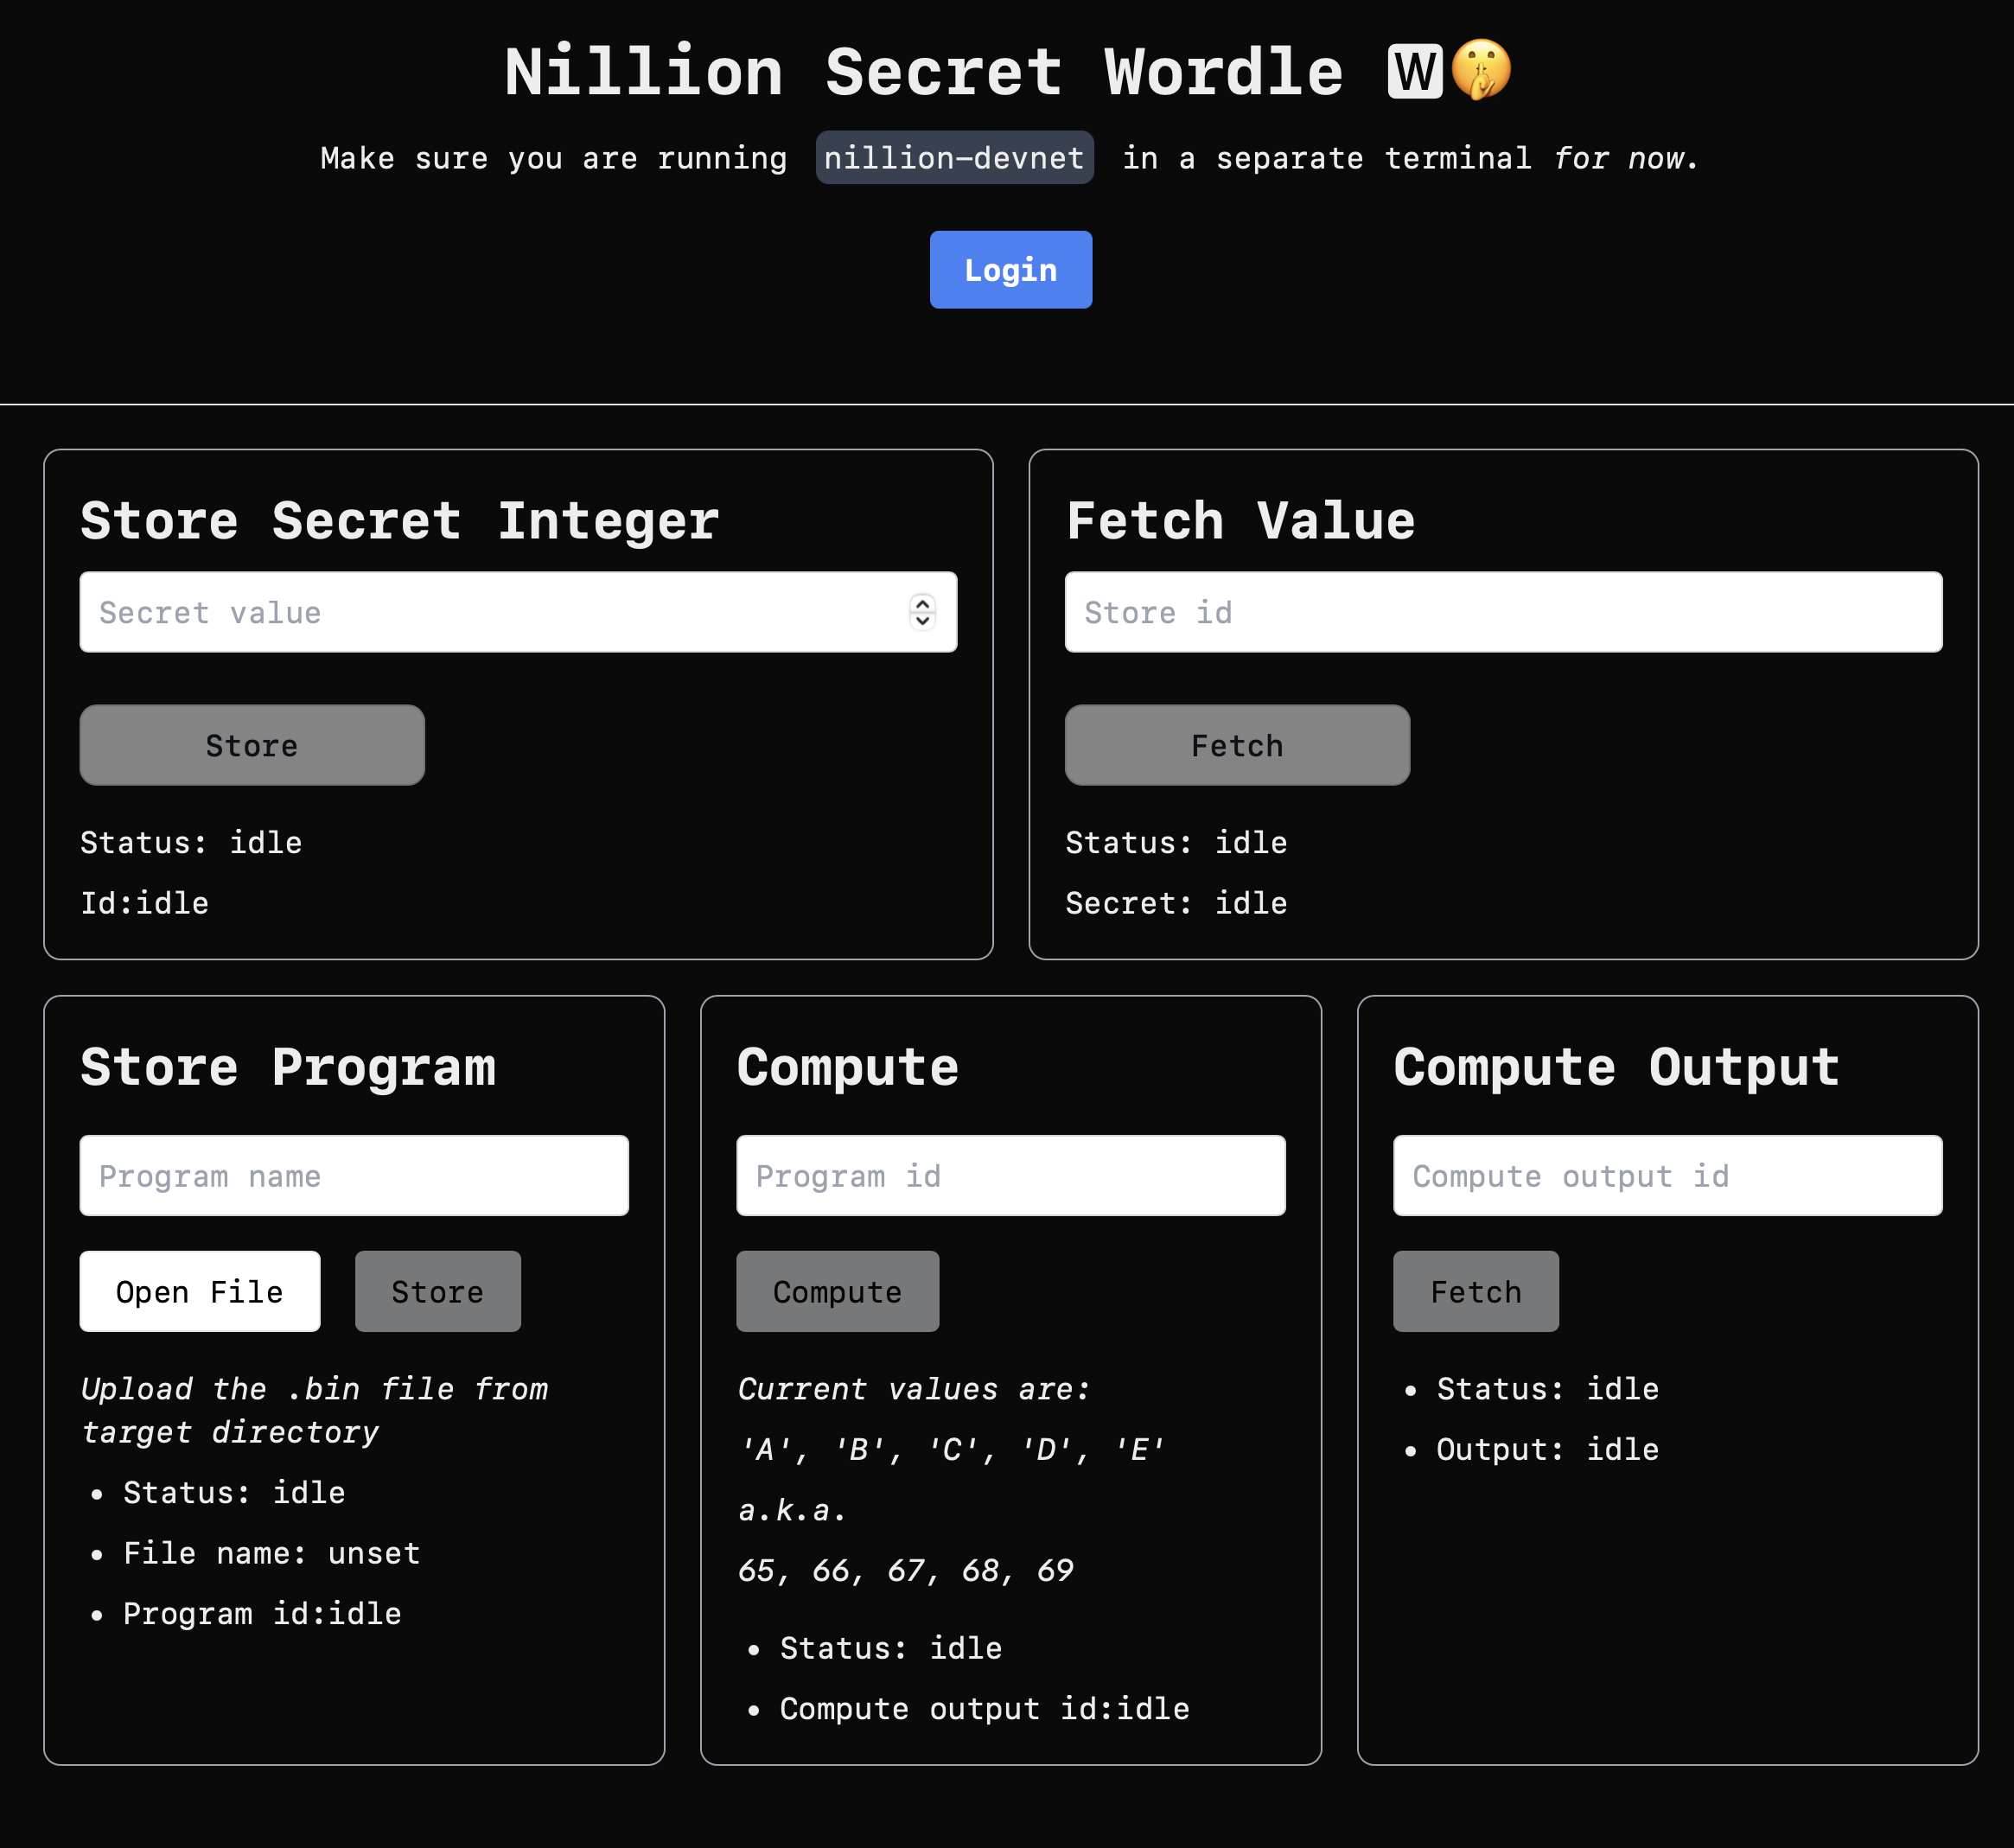
But now we need to actually figure out how to compute something on the Nillion network. As described above, Nada is essential to encoding computations on secrets in Nillion.
So let’s write the Nada program!
Hello, Nada World
Defining the program
In general when writing a new Nada program we first need to figure out the parties, inputs and outputs and involved so we can encode them correctly. Reasoning about the control flow inside the Nada “box” gets a lot easier when we already have a distinct and limited set of variables that we need to handle. The parties are, according to the original spec :
- the gamemaker who sets the correct word of the day
- the player who tries to guess the word of the day
Classic Wordle uses 5-letter words and 6 tries which works well for English — no reason to change that. The most straightforward way to encode the word in Nada is 5 integers where each one is an ASCII character codepoint. This would be the input format for both the correct word set by the gamemaker and the players’ guesses. As for the output, we need to know at which positions the matches occured. So this is also going to be 5 integers where a match is the letter’s codepoint and no match is just 0.
To keep it simple we would be doing a version which shows “exact guess” (local match) or “no exact guess” (no match) first. “Correct letter but wrong position” (global match) hint is part of the original Wordle but can be added later.
What about the data structures the Nada program would use internally?
All Nillion-based games we have seen so far follow the same basic pattern: checking for an intersection of N-dimensional arrays of secret values.
In Wordle, our object of interest is a single word/string/row of letters that’s also a (1-dimensional) array of characters. Thus, we would only have to deal with a 1-dimensional array in the Nada program.
The actual playing field in Wordle is technically a 2-dimensional array but the Nada program does not care about that as it only needs to evaluate one row at a time. So that only has relevance for the UI. It is different when we are talking about Minesweeper or Battleship, both of which need to evaluate a 2-dimensional array (a matrix) for each step of the game which necessitates a more complex Nada program. Most games and probably a good chunk of other things building on top of Nillion will be using this central concept of checking for an intersection of N-dimensional arrays. Therefore, the code written for Wordle should also be easy to generalize to other applications of the same principle.
A 1-dimensional array in Python is represented by a list. So the docs section on lists and list comprehensions was very useful.
Writing the program
Since create-nillion-app already provides the correct directory structure for building Nada programs, we just have to edit nada/src/main.py and replace the code in commit 5d8ecc6 with this Wordle program:
# nada/src/main.py
# the words are always 5 letters long
= 5
# the gamemaker sets the word of the day
=
# the player attempts to guess the word of the day
=
# have the gamemaker input 5 secret letters of the word of the day, indexes starting at 1
=
# have the player input 5 secret letters of their guess of the word of the day, indexes starting at 1
=
# for each letter from word of the day and player's guess
# if the player's guessed letter is the correct letter: output the guessed letter at that index
# otherwise: output 0 for "no match"
=
# return the output to the player
return
Short and sweet. Without the comments it would only be about 10 lines! Just like the docs said, list comprehensions were the right fit to encode what is needed. Still, there are quite a few things happening here. Let’s dissect the program.
Note
In the following code snippets we omit (for readability) the indentation which is required for Nada to correctly parse the program. The program complete with correct indentation is above.
This is just the import that makes all Nada language constructs available to the program.
# the words are always 5 letters long
= 5
As explained above, classic Wordle rule.
Every Nada program has to have a nada_main() entry point.
# the gamemaker sets the word of the day
=
# the player attempts to guess the word of the day
=
Just defining the parties here.
# have the gamemaker input 5 secret letters of the word of the day, indexes starting at 1
=
Now we start with the list comprehensions. This basically says:
- have this program take an input from the gamemaker named
correct_1 - this input is the first letter of the correct word of the day
- do that for the second letter which is
correct_2and so on until we have all 5
# have the player input 5 secret letters of their guess of the word of the day, indexes starting at 1
=
Almost the same but for the player’s guess, with inputs named guess_1, guess_2 and so on.
# for each letter from word of the day and player's guess
# if the player's guessed letter is the correct letter: output the guessed letter at that index
# otherwise: output 0 for "no match"
=
What zip(guess, correct) does here is take two arrays of letters and give us an array of corresponding pairs of letters from those. Then we just iterate through it and compare the pairs to decide if a letter codepoint or zero is going to be output — easy.
# return the output to the player
return
The output consists of 5 values which are called guess_result_1, guess_result_2 and so on.
That’s it.
Testing the program
Now how do we check the program actually works like it’s supposed to? By writing some unit tests of course.
The Nada CLI tool nada can generate boilerplate tests with nada generate-test. This command will create a dummy test as a starter which can then be adjusted to fit a real test case:
This results in a generic test in commit 0194740 which just runs the program expecting to get the same values back. But this can actually be used as-is for Wordle as this is the behavior we expect from it! In Wordle, this test checks for entirely correct guesses being handled correctly:
---
program: main
inputs:
  correct_1: 3
  correct_2: 3
  correct_3: 3
  correct_4: 3
  correct_5: 3
  guess_1: 3
  guess_2: 3
  guess_3: 3
  guess_4: 3
  guess_5: 3
expected_outputs:
  guess_result_1: 3
  guess_result_2: 3
  guess_result_3: 3
  guess_result_4: 3
  guess_result_5: 3
We input all 3s as the correct word. We give all 3s as the guess. We get all 3s as the result.
Now let’s actually run this test with the nada test command.
OK, it works! Nice. 🙂
Let’s say we want to be extra sure though and inspect the output values directly. Easy with nada run.
The outputs are just like we expect. Writing Nada tests was a breeze! Let’s write some more.
The “no match” test in commit 6d2ba0f where no letters match:
---
program: main
inputs:
  correct_1: 3
  correct_2: 4
  correct_3: 5
  correct_4: 6
  correct_5: 7
  guess_1: 1
  guess_2: 1
  guess_3: 1
  guess_4: 1
  guess_5: 1
expected_outputs:
  guess_result_1: 0
  guess_result_2: 0
  guess_result_3: 0
  guess_result_4: 0
  guess_result_5: 0
And the “partial match” test in commit db3273f where only some of the letters match:
---
program: main
inputs:
  correct_1: 1
  correct_2: 2
  correct_3: 3
  correct_4: 4
  correct_5: 5
  guess_1: 5
  guess_2: 3
  guess_3: 3
  guess_4: 3
  guess_5: 5
expected_outputs:
  guess_result_1: 0
  guess_result_2: 0
  guess_result_3: 3
  guess_result_4: 0
  guess_result_5: 5
Let’s see if all of this works now…
OK, tests done. Can’t really think of any other test cases so let’s proceed to build the Nada program.
Compiling the program
The program needs to be compiled or “built” to be stored on the Nillion network. So we can use nada build to actually build it and get a target/main.nada.bin binary file which is the compiled image of the program.
Looking good and added to the repo as main.nada.bin . With the Nada program part finished quickly and easily, we now have to take care of, well, writing the rest of the app.
It’s Next.js time.
Building the UI
Storing the letters
After changing the project metadata in commit 5f002b3 , we create a Wordle component based on the default StoreValue one with commit 5124cfb and commit c9e5dde .
This is what it looks like:

The 5 letters each get stored as a single integer value of their ASCII codepoint. After clicking Store all we can see the status (which in this case is success across the board) and copy each single value’s store ID. When we copy the store ID of the first letter and fetch it using the default “fetch value” widget, we get 65 back. Which is… Latin Capital Letter A — exactly what the first letter is. 🙂
Shouldn’t that be
U+0041then?
Yes and no.
U+0041 is the Unicode codepoint of Latin Capital Letter A . By convention, Unicode codepoints are written in hexadecimal format and ASCII codepoints are written in decimal format. 41 hex and 65 dec are actually the same number. Unicode basically includes the ASCII range as the “Basic Latin” block so the codepoints for characters contained in ASCII are always going to stay the same in Unicode, adjusted for hex encoding.
Now if we check the last letter…
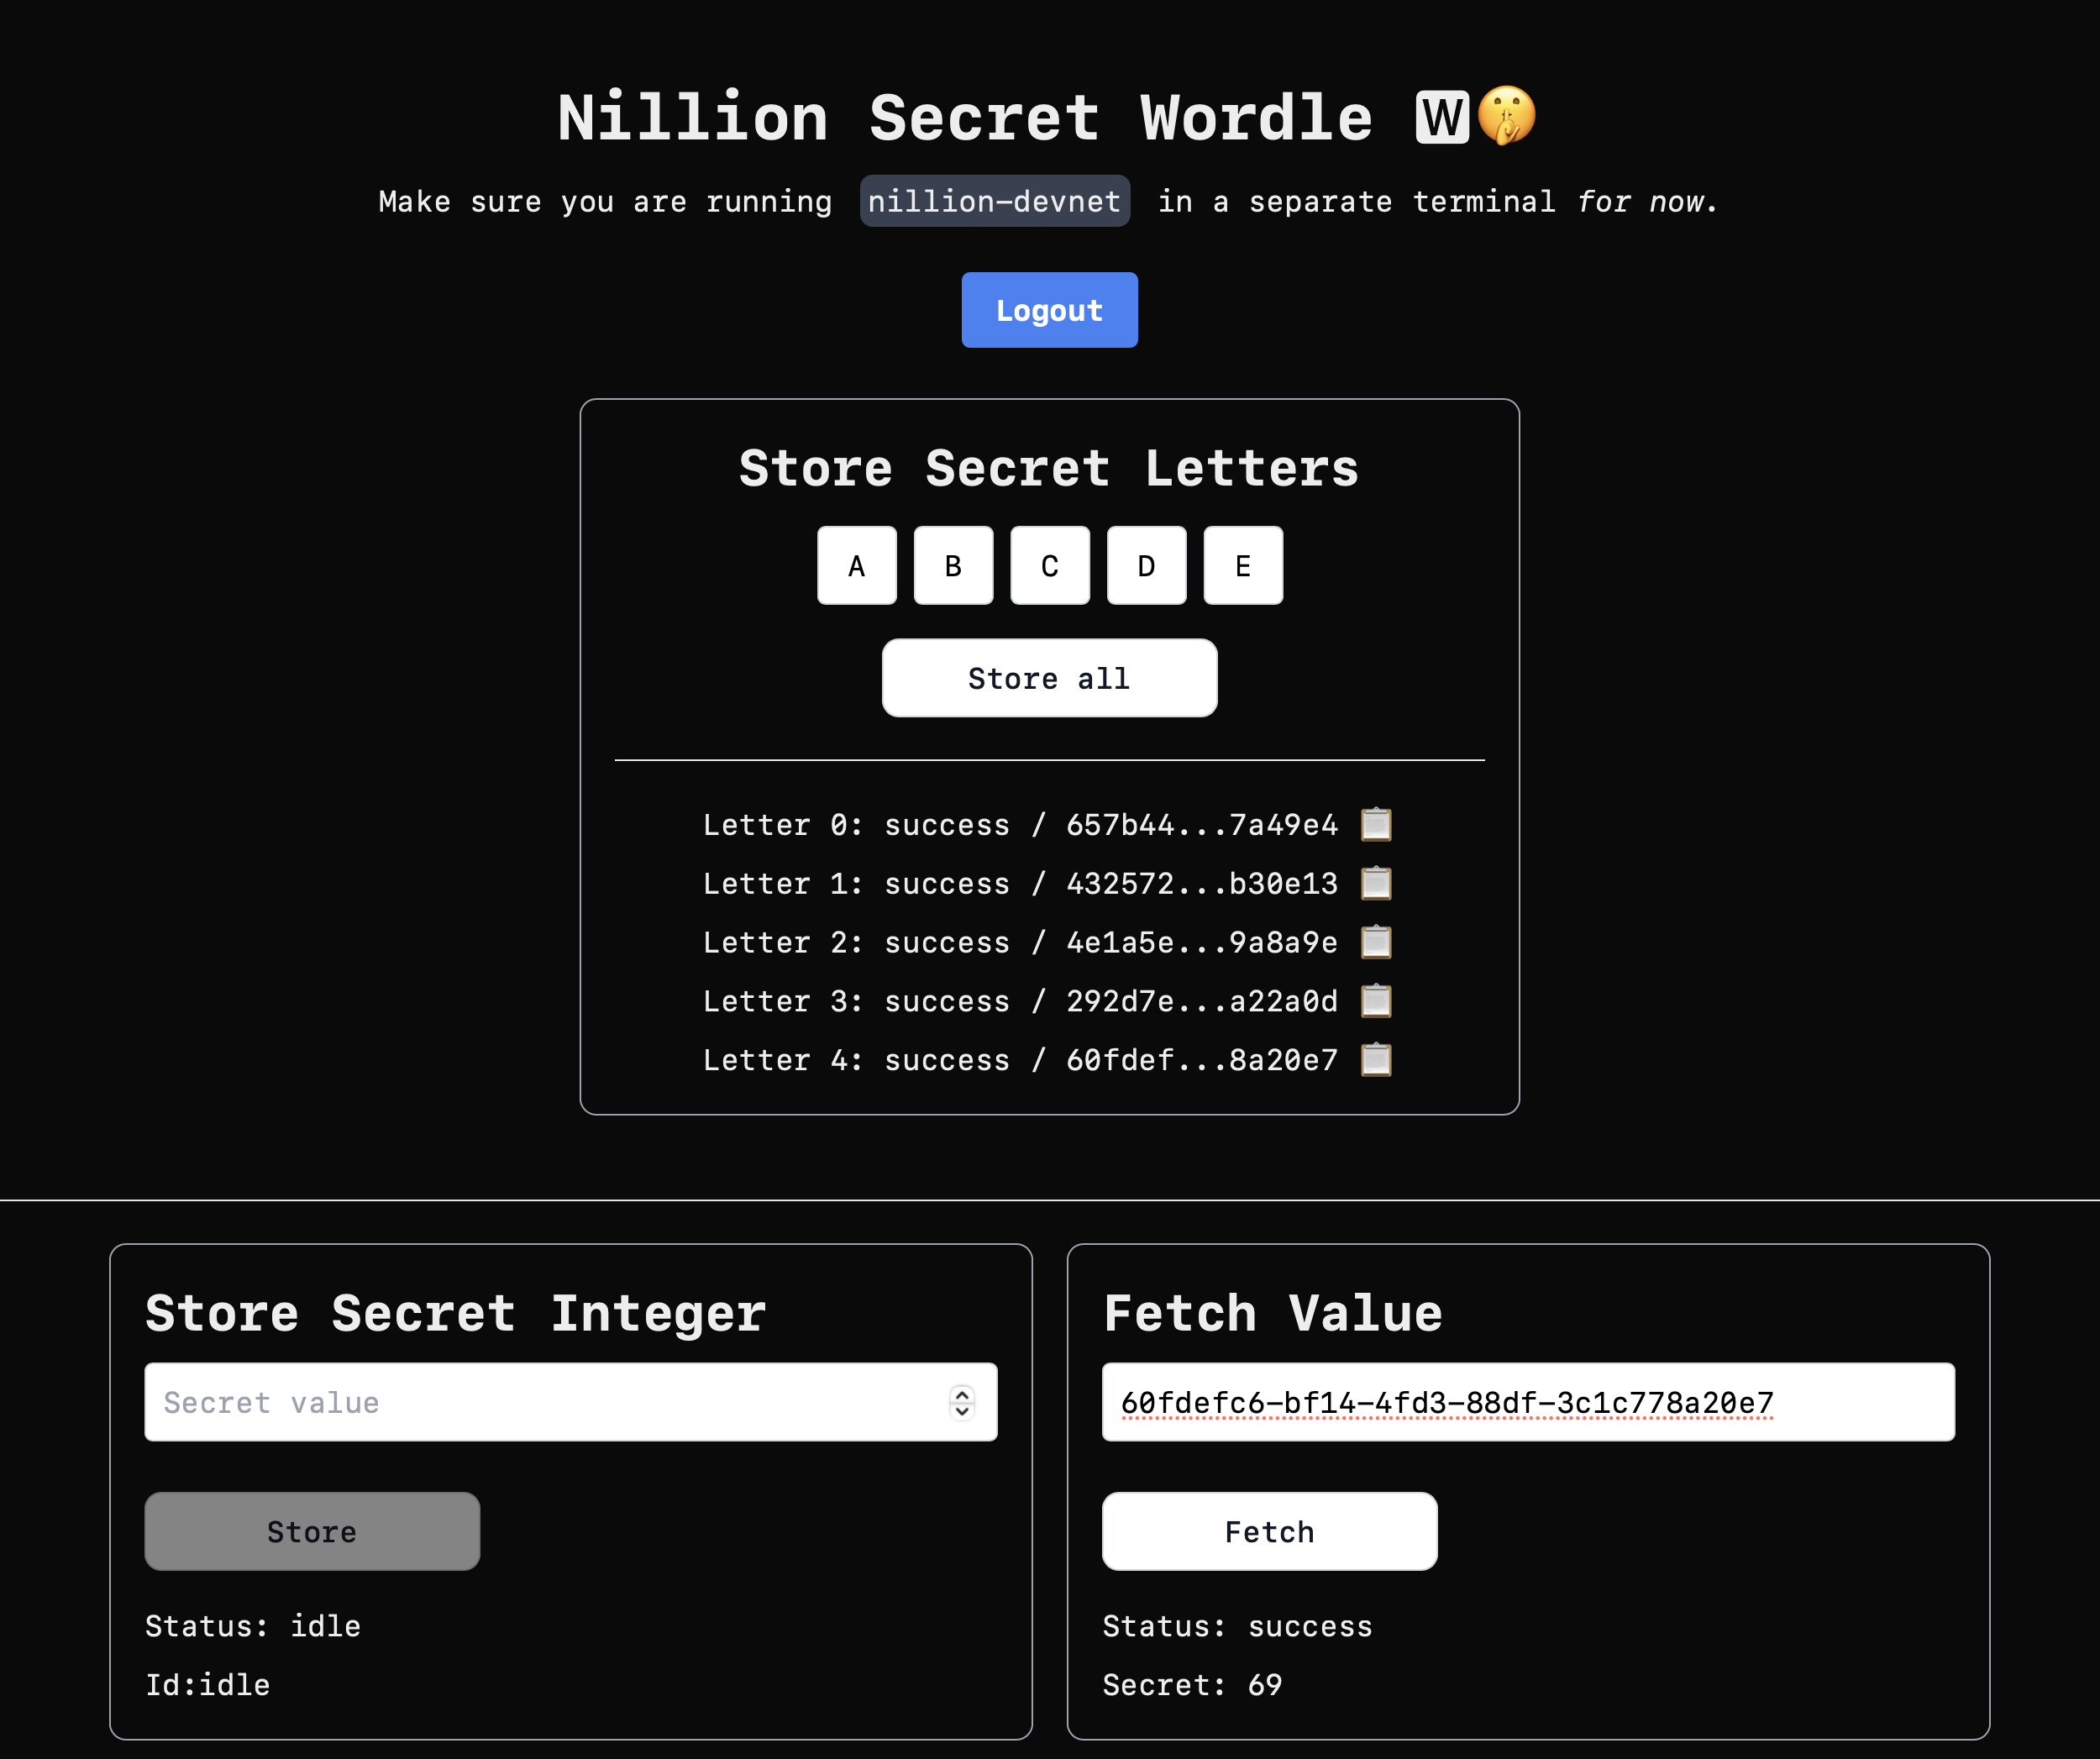
It’s 69 which is U+0045 which is Latin Capital Letter E . So that’s working as expected.
 Now let’s just make the numbering human-friendly by having letters start at 1. This is a very simple change in
 commit c97fd65 :
Then, it is time to focus on building the game.
Planning the game UI
What we would like to do next is basically:
- upload the Wordle Nada program to the network and remember its ID
- get the 5 letters input from the gamemaker (the word of the day) once
- get the 5 letters input from the player (their guess) for a maximum of 6 times
- for each guess, get the 5 letter Nada program output
- if we have any matches: highlight those for the player
- if the player guesses in 6 tries or less: congratulate them on winning
- if not: congratulate them on losing
The input widget takes care of 2) and 3) mostly, but so far it only stores the letters and we want to actually pass those to the Nada program. So the logical next step is 1) as well as writing the interface between the input component and the Nada program stored on the network. After that, we will also need a way to display successive guesses to the user, with correctly and incorrectly guessed letters marked.
Let’s check that this approach is sound.
Exploring the default UI
We can just tweak the default widgets which are already there to:
- upload the program — our Wordle program this time, not the default demo one
- give it inputs from the letter input component
- display the computed outputs
After that, we can use these widgets to check the three general test cases of the Nada program:
- the full match
- the none match
- the partial match
When all of that looks good, we can proceed to building and styling custom components.
Let’s first take a look at the default demo components:
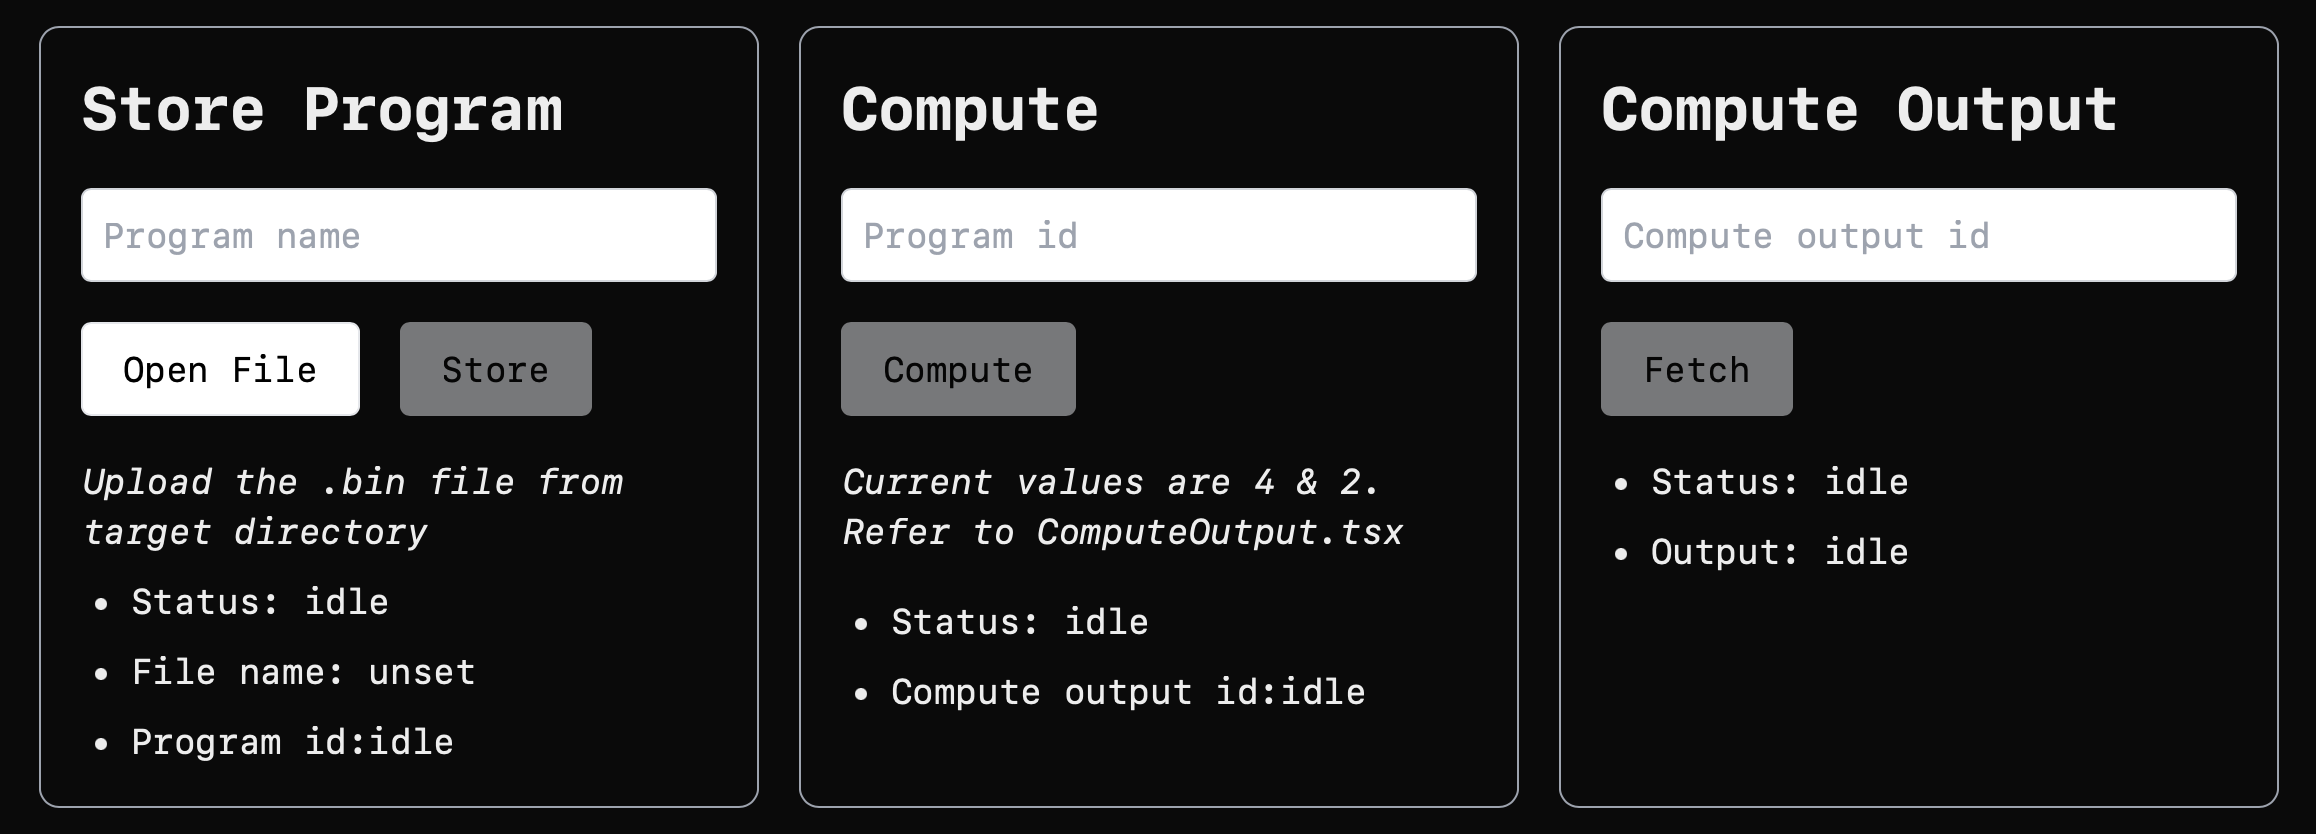
Store Program and Compute Output can be used pretty much as-is. But 4 and 2 as input values surely won’t work for the Wordle program… It expects 5 values each from 2 parties for a total of 10. So there’s no way around tweaking the Compute component which has the inputs of 4 and 2 hardcoded for demo purposes. It’s no big deal though. 🙂 Let’s just hardcode the values that would be reasonable for Wordle instead of the original ones and update the help text to match in commit 0d6f29f .
Now the app is ready for a full Wordle computation cycle!
Computing a single row
 First, we store the compiled Nada program written earlier.
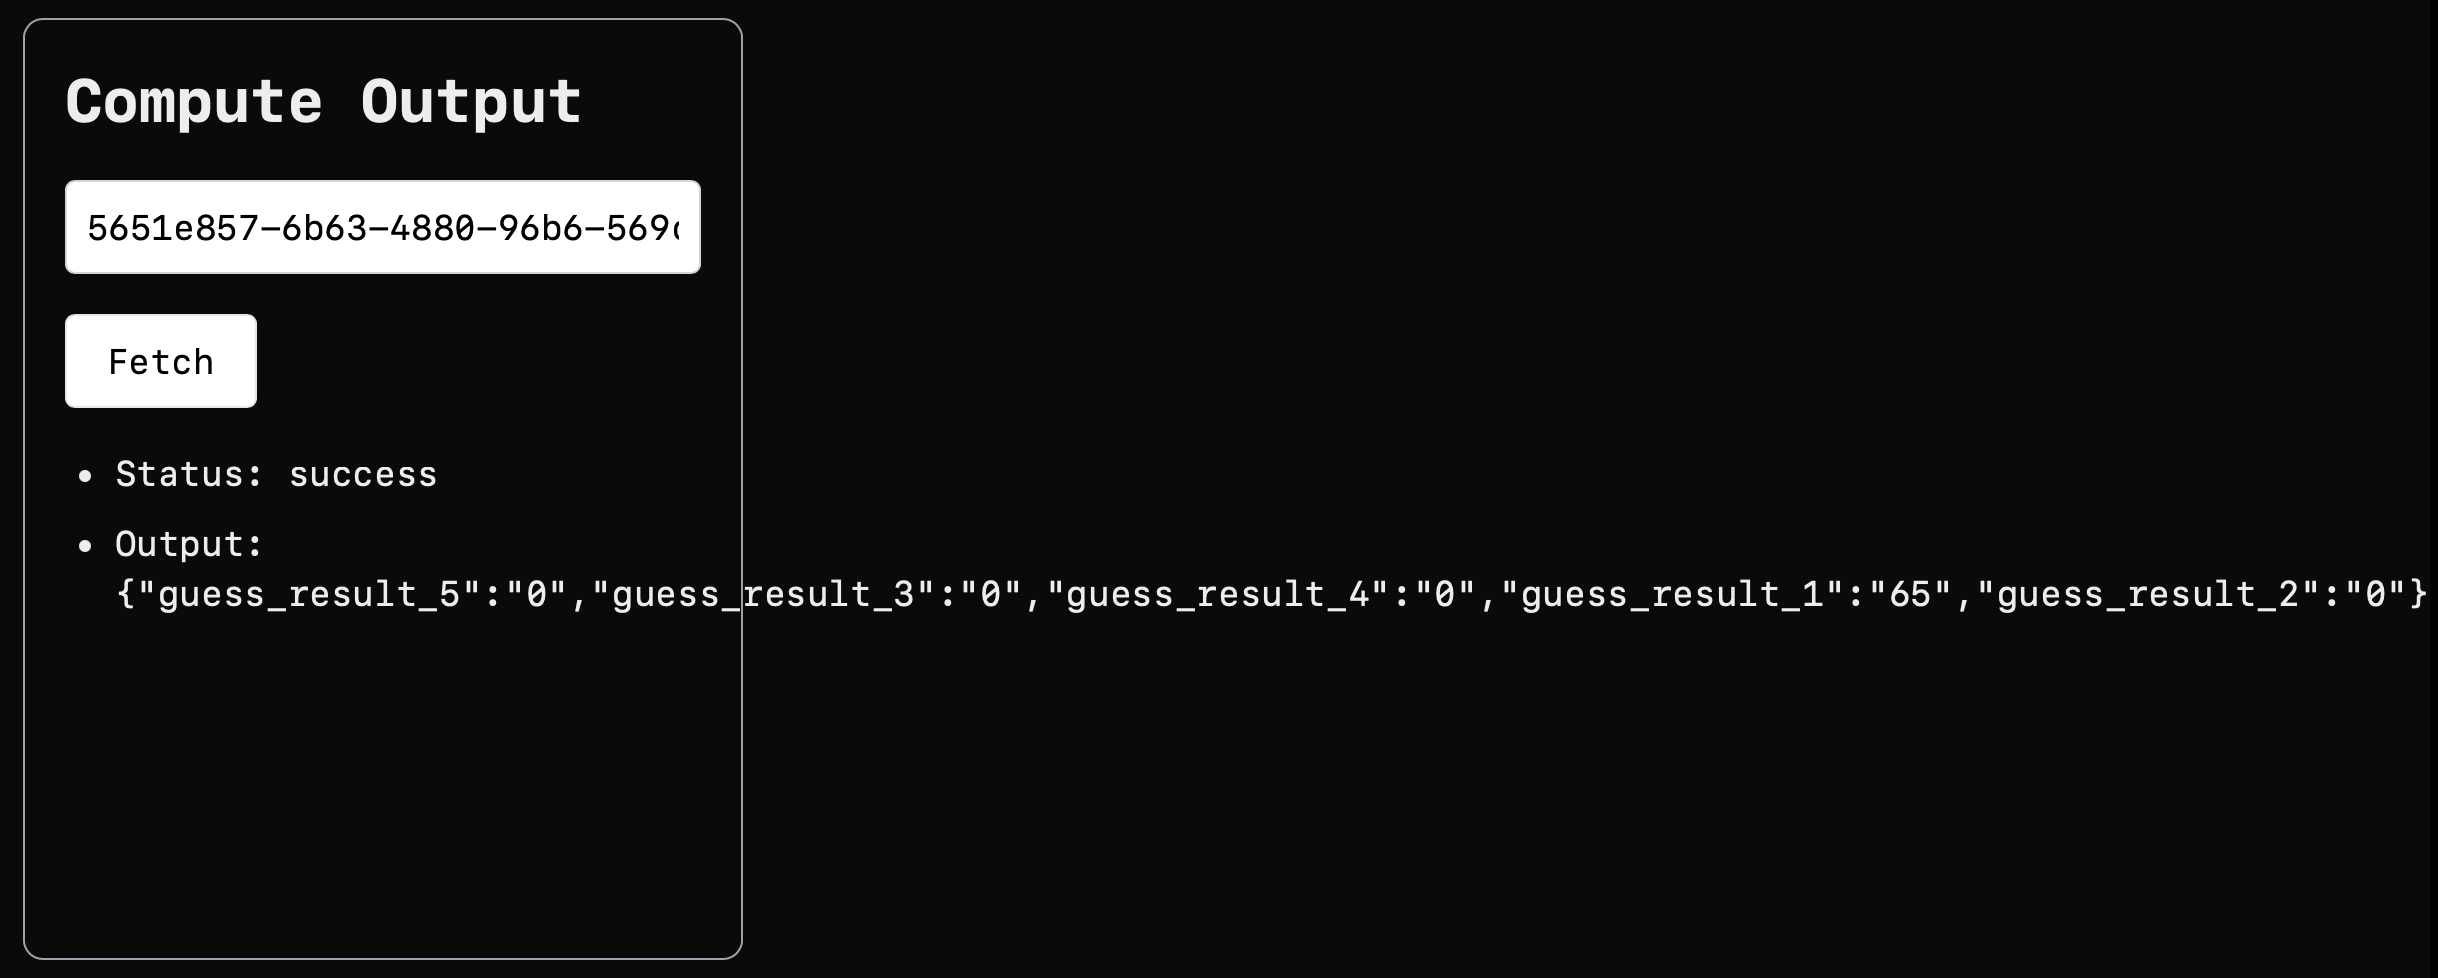
 Then we copy-paste the resulting stored program ID to the compute component and click the button. Behind the scenes the component supplies the values of
 ABCDE for correct word and ABCDE for guess to the program.
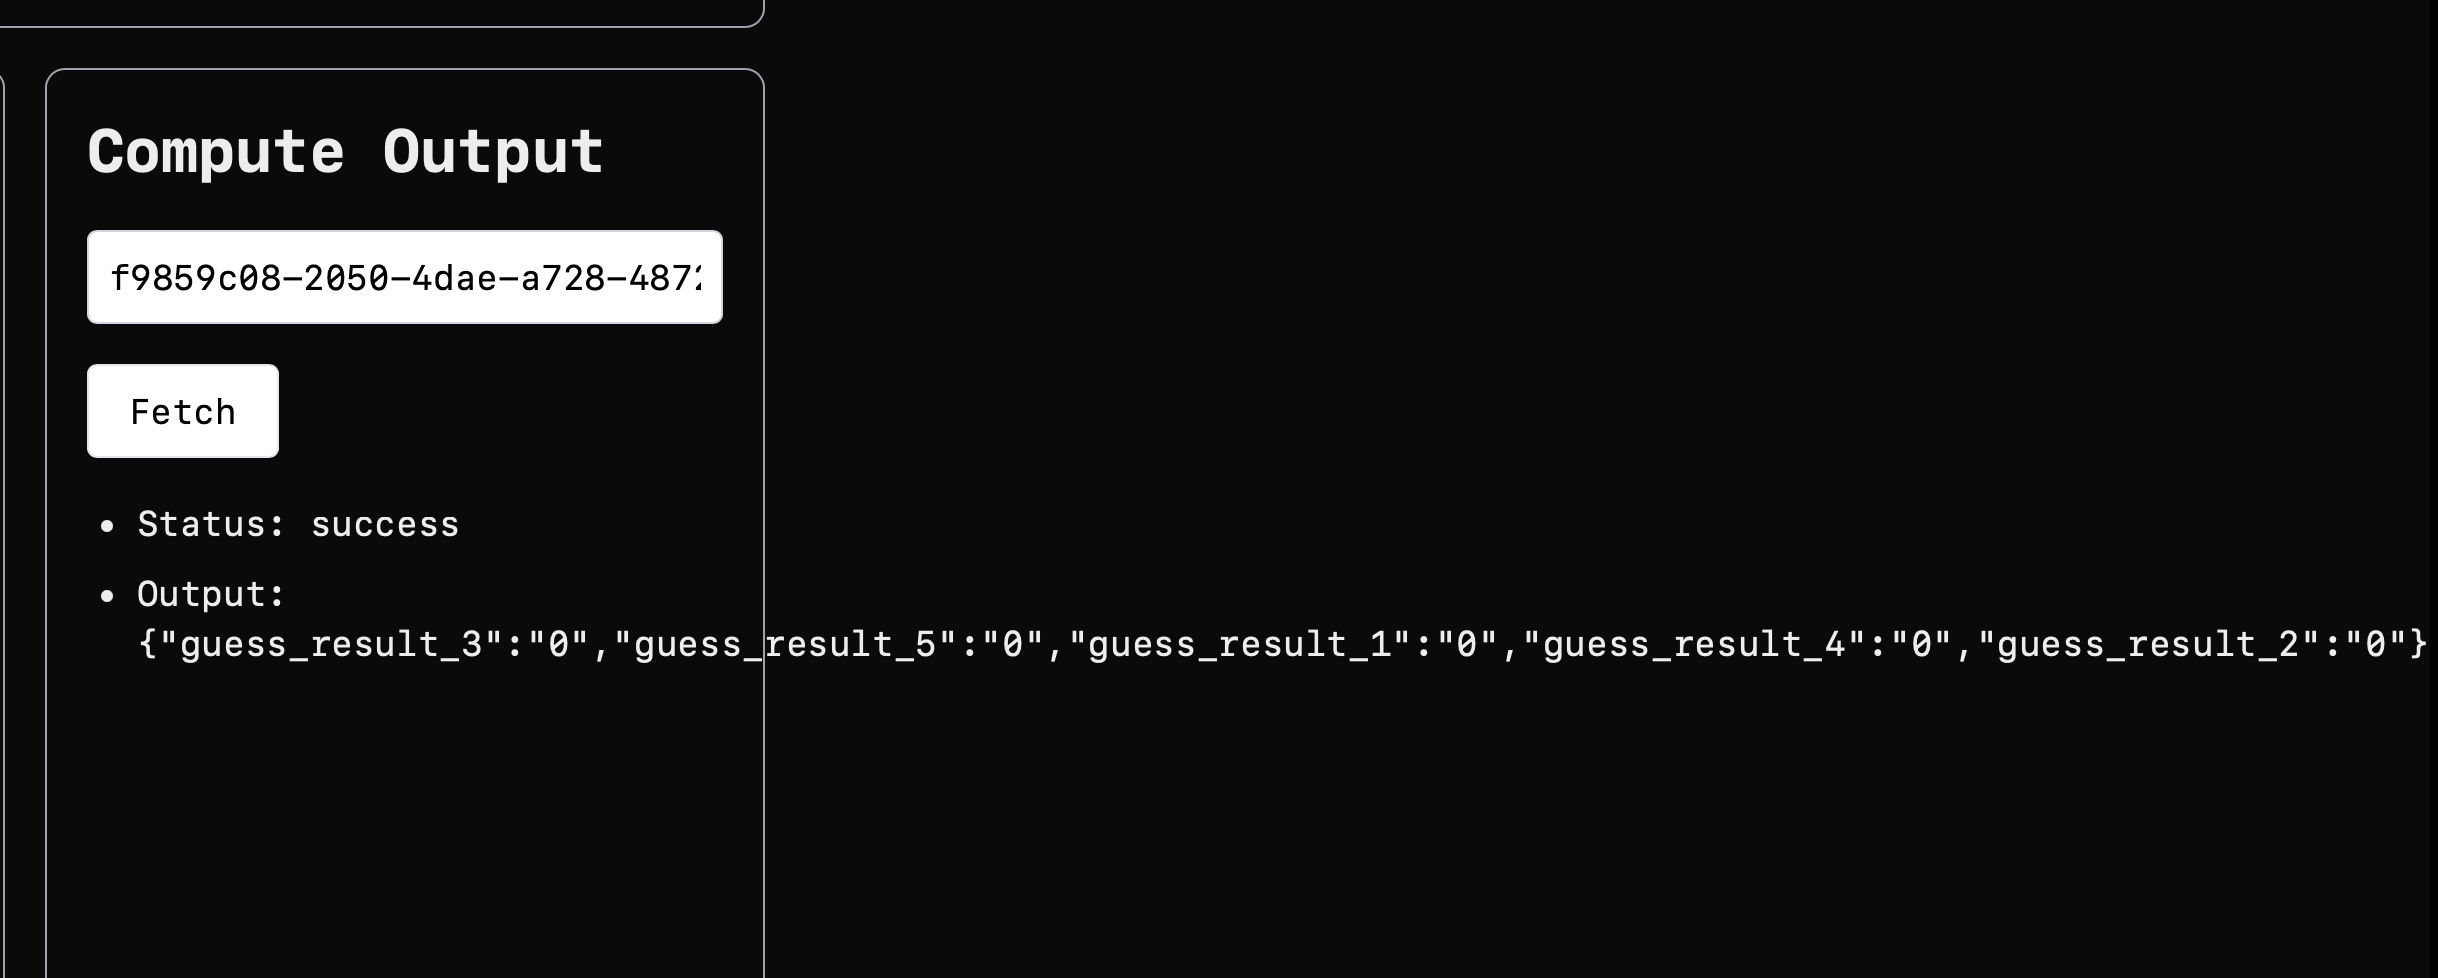
Now we need to get the outputs to check if “ABCDE” and “ABCDE” do actually match… 🤔 let’s copy-paste the compute output ID into the Compute Output component’s field and click the button.

It broke the styling and the outputs are not in the natural order of 1 to 5. But that doesn’t matter to us because we can still see the program worked as it was supposed to for this test case — nice!
What about the other two test cases? They should work too but maybe we want to be extra sure. So we update the Compute component to supply inputs that partially match in commit b81f3f9 . In the changed Compute component only the first letter would actually match. So we expect letter 1 to be 65 and letters 2-5 to be 0 in the outputs.
And we get what we expect here.
Now, none of the letters match in commit 994085e so all outputs should just be 0, right?
They are.
It means that not only did our Nada program work as desired, but the Next.js app UI also interacted with it correctly! Now we can actually move on to designing the Wordle game field, the letter square. 🙂
The game field
With 6 tries for a 5-letter word we need a table of size 5 cols x 6 rows = 30 letter cells to display the guesses done so far above the player’s guess input. In fact, to keep it simple we can just reuse the letter input component we already have to display that. For this purpose we would just need to make it readonly, repeat it 6 times and make sure the separate instances don’t clash in any way.
Then it would actually be really nice to factor out the single “Wordle row” into its own separate, reusable component which can be flexibly used as input or output. In the end we’d probably need distinct styling for input and output rows but that should be simple to do inside the component itself depending on the props it is called with. This would make the Wordle UI quite DRY and easy to define which is always good.
 The first thing we are going to do here is not worry about styling or interfacing with the Nada program at all for now and just make a dummy playing field in
 commit 1339e03 :
While we are both gamemaker and player we don’t really mind that the program needs both inputs at the same time to work. But what if the gamemaker and the player were not there at the same time? If they are async we need a way to store the word of the day persistently for some time so multiple independent players can take guesses. We can’t use something like a hidden input on the page either because that makes it easy to cheat by finding it. The solution is fairly obvious — we will need to store the secret letters on the Nillion network! There is no need to do that for the player inputs however. If the player is on the page now, they probably want to play now and not schedule a guess for later. 🙂
Login-walling Wordle
In commit 0148a8e we add a context that the Login component holds and render its children depending on the values. This allows children of the Login component to assume that if they are being rendered the program ID which we need for the actual computation is available.
 In
In commit 30bac18 we move the program-loading code to the login component so it is available in all children through a common context and prepare for adding the gamemaker input:
Uploading the Wordle program
If the program is selected through a file input like in the default Store Program component, it is fairly easy to get the contents because the user basically points us to the file and we then get a handle to it in client-side JS code. But here we already have our own Wordle program and we would like that the user can only interact with it in this app. So we don’t want the user to give us a program file and neither do we want them to give us a program ID on the network.
That means the Wordle code has to get the program from the server. There are a couple of ways this could go but probably the most straightforward way to do that is to expose it via HTTP and fetch() it from the component. We put a copy of the compiled program in public/ so it can be downloaded by client code in commit 5b475d3 and we put a button inside the Wordle component to download and store this particular program in commit d099967 .
 And a quick program ID preview field just to make sure it’s working:
We get rid of the program ID preview in commit 0ecce78 as we know we have access to the correct ID from the code now.
Let’s connect the input element to the program inputs now.
Passing inputs to the program
 We already have the Wordle letters input which can give us inputs in the correct form but just stores them so far. And we already have the correct code to call the program in the
 Compute component we customized earlier. So in commit 5509709 we just copy code from the Compute component and adapt it a bit because the input field no longer stores the values but passes them to the program:
Now what happens if we click “Take a guess”? Nothing but no error either.
Of course, now we need to collect the compute outputs and put them into the correct place!
Getting outputs from the program
Putting the outputs in the game field is slightly more tricky than taking care of the inputs. We have the same program each time which we get the outputs from but we now have 6 rows to put the outputs in. Which means, we need to track which row is the next one to be filled.
Would it be possible to simply append a new row every time we get new outputs from the program?
Sure, but from a UI standpoint it wouldn’t be great as the input field would have to move lower as more rows are added and it would not be immediately obvious how many tries you have left.
Actually, to keep it clean now that we have a bit more complexity, it might be the ideal time to introduce the single “Wordle row” component.
For the input, we have the logic that sends the inputs to the program in the main Wordle component and ideally we’d keep it there too as it looks like the best place for it to be so far. So we can define React state variables in the Wordle component and pass those as props to the input row so it can set them appropriately on user interaction for now. We can then get the set values from the Wordle component to send to the program. This is probably not really the cleanest way to do it but we will run with it for now as a PoC. For the output rows, it would be nice if they could just “compute themselves” from a Nillion compute result when it is ready actually… is that possible? Let’s find out. When doing that we need to keep in mind that calling the function and getting the outputs are technically two separate Nillion operations in the SDK. So first we call the program with the inputs and we get an ID of the outputs which we then look up separately. So commit 3ef4a24 has the Wordle row component PoC.
 And it already looks cleaner than putting everything in the Wordle component itself. The input and output row synchronize on the
 nilCompute now. We also drop the explicit compute button as we can just consider an input row done when it’s filled. This does the full Wordle “compute cycle” now, with input and output actually linked to user interaction:
 Just as before, the secret word of the day is just “ABCDE”. Let’s try “guessing” it. Just entering all “A“s…
 OK, so we guessed the “A” in “ABCDE” — nice:
Actually, why not have input rows “turn into” output rows automatically so the game can actually be played on the “output” field? This would look nicer and should be a breeze to implement. After all we can use the first empty row for our guess and once there are no more empty rows, there are no more guess attempts left.
 Done in
 commit f3f04ec , this is the result of entering:
AAAAA
BBBBB
CCCCC
DDDDD
EEEEE
FFFFF
 It looks like we do not need the default demo components anymore so we clean them up in
 commit 8784495 . This results in this minimalistic look for Wordle:
The actual Nillion/Nada interaction is pretty much done now. 🎉
However Wordle is, of course, not done yet.
There’s plenty of work left on the UI before it looks and feels like a game.
Lifting state up
After doing fairly ad-hoc state management for a bit, in commit c26d49f we go with a more general approach and lift the game field logic into the Wordle component, then basically use WordleRow as a view into that state. That means there is only one onCharAt callback that needs to be set as the onChange event handler on the player inputs, telling us which character was input and where. The WordleRow component now simply gets it state passed down from the parent Wordle component as props and can change the state through the onCharAt callback. The “where” in our case means the coordinates of the letter as (row, column).
For simplicity let’s just call those y and x in the code. Like this:
+    0   1   2   3   4   letters
  + --- --- --- --- ---→ x

0 | 0,0 0,1 0,2 0,3 0,4            first letter is (0, 0)

1 | 1,0 1,1 1,2 1,3 1,4

2 | 2,0 2,2 2,2 2,3 2,4

3 | 3,0 3,3 3,2 3,3 3,4

4 | 4,0 4,4 4,2 4,3 4,4

5 | 5,0 5,4 5,2 5,3 5,4            last letter is (5, 4)
  ↓
r y
o
w
s
Unlike the usual order, the y coordinate is more significant for us and so it goes first. We address the row first since in fact, the row is our “unit of computation”; it is sent to the Nada program in whole and we also get a single row-sized reply back. The individual letters in a row are only significant as long as the player is still taking their guess but for the computation itself we just take the entire row when it is ready. To get row-scoped data, we only need the number of the row or y. Speaking of that, this commit also adds active row tracking. 🙂
The active row is the first (and only) row where the player can input their guess. The rows before and after it can be disabled since they are not where the guess “is happening” at that moment. There can only be one active row at a time, so we track it through an index variable. We highlight the active row differently to the rest to give a visual cue to the player. We also now track individual row state through a very simple 1-way state machine with 4 states.
All rows start out as “idle”. When we fully fill a row with a guess:
its status changes from “idle” to “guessed”
the letters are sent to the Nada program for computation

- the row is filled with question marks and further input is blocked while the computation is running

the result is received back from the program and the row status is set to “computed” — the matching letters are shown, the rest are set to hyphens for “no match”
the next row becomes the active row for another guess
Now, what happens if we run out of rows to fill?
 Game over! 🙂
We have not guessed the word of the day in 6 tries and should try again tomorrow.
What happens if we guess the word right though?
 Of course, winning the game.
We also tweak the UI to be a bit more game-like with a touch of color and bigger letters here.
 Now onto the actual gamemaker input which started this refactor —
 commit ecedb5d means no more hardcoded word of the day!
Even though the gamemaker and player inputs are on the same page here, the word is actually stored on the network. Later, we use the store ID of the 5 letters of the word of the day as another input to the Nada program. So while the guess is supplied to it in “real time” and not persisted, the word that we need to guess is actually persisted in the Nillion secret store and can be referenced at any time as long as we have the store ID. This means it should now be easy to decouple the player and gamemaker inputs completely. For this Wordle implementation, we need to set a word once with one client at one time and then guess the word by any number of different clients at another time.
The only other thing we need to consider here is that the stored values need to be stored with an ACL which allows the player to use them for computation with the Wordle program. Of course the player does not need any of the other permissions (retrieve, update, delete), just compute. So now if there is a separate player who does not know the word that has been set, their only way of finding it out is guessing it… which is the goal of the game. 🙂
But both parties are still hardcoded to be the same client in the code. It is time to fix that!
Decoupling the parties
Since commit ecf150c we now render two separate UIs with a buttons witching between them.
 Player UI:
 Gamemaker UI:
The next thing that we need is automatically switching focus to the next letter when the cell is filled and switching focus to the next row when the current one is checked which is done in commit bc4fd4c — fairly straightforward change that required using React refs to refer to the “next” cell for switching focus.
Correct and wrong letters
 Then, the highlighting of correctly and wrongly guessed letters was done in
 commit 616af6b . While we can trivially record whether a cell has the correctly guessed letter inside with a boolean, we also need to represent the state where we don’t know if the guess was correct or not yet, such as before computing on the row. The most obvious way to do that was of course using something like boolean | undefined for the state.
Logging in via Keplr
Hardcoded login credentials were replaced with Keplr-based auth in commit e2b6258 . Basically what we had to do was just to remove the hardcoded secret key / signer. This makes the SDK automatically use Keplr for logging in.
Note
When using the devnet, the chain first needs to be added to Keplr .
Now it is time to prepare for testnet deployment.
Full multi-party flow
The flow would be similar to this:
- freshly deployed Wordle allows access to the gamemaker UI
- the gamemaker uploads the Wordle program if it has not been uploaded yet
- the gamemaker sets the word of the day which is stored on the testnet
- the gamemaker gets back the program ID and the store ID for the word of the day
- the program ID, the store ID and the gamemaker’s party ID are set as environment variables on the app
- the app picks up the variables and exposes the player UI and then it’s ready to play!
And it is implemented in commit f98291a . Notably, the gamemaker UI is now a proper wizard that guides the gamemaker through the required steps in sequence.
With this, the core of Nillion Wordle is done.
Going live
The deployment to Vercel after fixing the lints in commit 8ba0b7c was uneventful, which is good.
And then… Nillion Wordle was finally live!
Time to celebrate! 🎉
Conclusion
The Nillion community was eager to play Wordle and provide feedback as soon as it was published. There were bugs found and ideas suggested — this was much appreciated! For example:
- Logging out and logging back in again would not reset all state and some would be left over, so the workaround before
commit 7b5d5edwas manually refreshing the page — no more. - Manually setting a word every day as the gamemaker is not very fun, so scheduling words of the day in advance was implemented in
commit 7d5403f. - The “global match” from the original Wordle (correct letter at the wrong index) was implemented in
commit 6d52441. I might cover the change to the Nada program later in a separate post as it required some trial and error to get it right — stay tuned! 😎 commit 32dc719added an “active row / row loading” indicator.- The documentation links on the login page were made more visible in
commit 35a4bd4since there was feedback that it wasn’t clear that they are clickable.
Nillion Wordle looked really good now and moreover, building it was fun all the way through. The Nillion Discord community was friendly and supportive in providing feedback. I look forward to completing more projects on Nillion, hope that you find this post useful and that this inspires more people to start building too! 🙂